
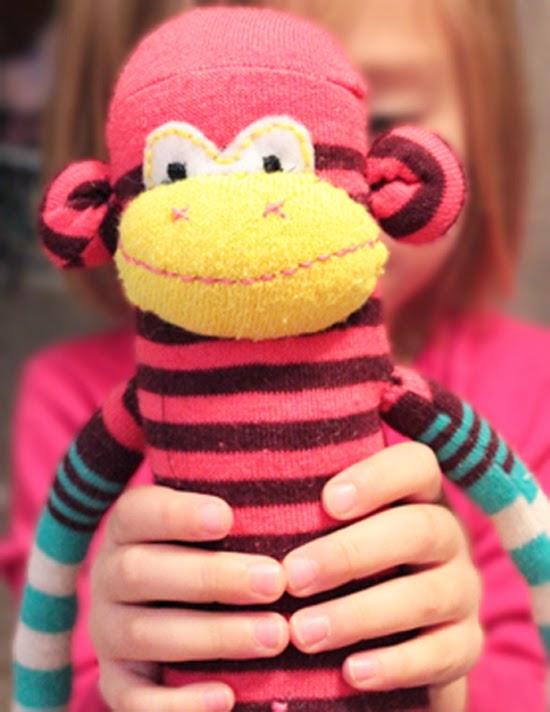
If you are wondering how to make a sock monkey, then here is a friendly post for you. Sock monkeys are so much loved by the children, and they can be a perfect gift item as well. They are easy to make and can be an amiable gift for kids. Besides, you can also hang them on walls to give it a splash of uniqueness to your decor. However, you need to know how to make a sock monkey for all of this. Fret not if you don’t know. This post can guide you with the practical steps to create a sock monkey with a few handy steps. Along with time, you will need a few more things that are described in this post. Let’s explore!
Table of Contents
What Is A Sock Monkey?
The name of the project is self-explanatory and explains pretty much about self. Sock Monkey is a monkey made of socks. All of this can be made with the sock, so you can choose them based on your own preferences. For creativity, the sky is the limit. You can follow your heart and try different sock patterns and colors. The most important thing is that you should enjoy this experience. The more fun you have making it, the better will be the product. Besides, you can also train your kids on how to make a sock monkey as a part of their extracurricular activities.
Steps To Make A Sock Monkey
The best way to make a sock monkey is to make it one by one. In the first place, you can make the body parts of the monkey one after the other. Once you are done, you can sew them together to give it the final touch. Are we missing something? Yes! We will need the supplies. Therefore, before we proceed any further, you need to keep a few items handy with you.
Things You Will Need
Below is the list of the essential supplies you need to have with you if you want the monkey sock making a hurdle-free experience:
- Pair of socks is the most obvious thing you will need before moving ahead.
- Fillings to stuff your monkey; otherwise, it will look malnutritioned.
- Black and white felt fabrics.
- Threads: Sewing and embroidery.
- Sewing machine with the needles.
- Hand sewing needles.
- Scissors and pins.
- Markers to mark on the materials.
This much will be sufficient stuff, to begin with, your sock monkey-making process. Now that you have it, we can jump to the section that explains the whole procedure.
Let’s Start!!
As we have already discussed that we will make the parts of the monkey in the first place, and when they are done, we will assemble them together to make our full-fledged sock monkey. Here we go!
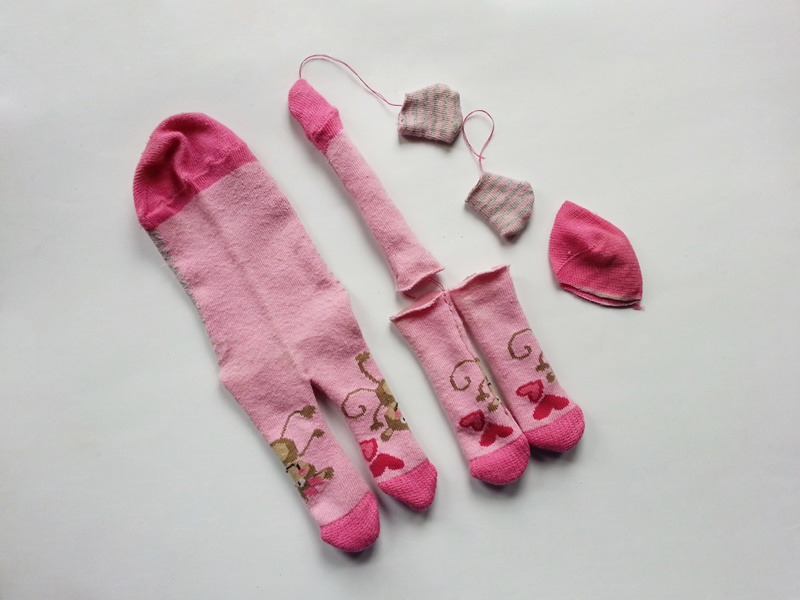
Step 1: Cutting The Socks
Take the pair of socks and understand how to make a sock monkey using a single pair of socks. We will cut out leg and body from one sock, and mouth, ears, tail, and two arms using the other sock.
The one with the leg and body needs simple cutting—Mark two parallel lines just in the middle of the sock that start from the opening side. Besides, the cut on the top will be a little curved.
On the other hand, you have to cut out the above-listed shapes from the second sock. To do it correctly, you need to use the maker and then mark the shapes on the sock. Now you can cut the shapes with a scissor flawlessly. Once you have done the cutting part, we can proceed further to the next step.
Step 2: Turning The Part’s Sides Out
In the next step, you will require to turn the parts outside by deploying the appropriate materials. When the parts are done, jump to the next step.
Step 3: Filling Of The Parts
Use the stuffing material to fill the body, legs, and arms of the sock monkey. You can utilize the incredible turning and stuffing tools to complete the procedures. These tools can be easily acquired from your local stationery shop. You may fill the tail with the filling stuff or just leave it unfilled to swing here and there. If you don’t want the stuffing to look lumpy or uneven, roll it out to bring it in the proper shape.
Step 4: Closing The Open Parts
Proceeding further, you have to apply the stitch to close the abstract openings at the closure of the sock that already has the stuffing material filled. When doing so, you need to confirm that the edges of the stitches are moved inside well; otherwise, they will look hideous. Adding an additional layer of the stitching can make it more solid and durable. You can change the placement of pieces differently for every other sock monkey you make. To confirm if the placement looks good or not, you can pin them up before the final stitching.
Step 5: Moulding The Face
Cut out the face template by tracing it onto white felt. Using a running stitch, sew two little circles from the black fabric into position. If it’s for an older child, you can use the design provided as a guide for the size of the eyes. Alternatively, buttons can also be your option.
Step 6: Placemen Of The Face
Now that you have the monkey’s face ready, you can check its position by pinning it. Once you find the proper place, just run a stitch to assemble the face on the rest part of the body.
Step 7:Adjusting The Parts
Fold the mouth/nose piece’s rough edges inward. The mouthpiece should be pinned over the bottom portion of the face template, with the toe seam at the bottom.
Step 8: Finalize The Stitching
Leveraging the stitch, sew the different pieces of the face. Sew on a mouth line using a backstitch where required, which might be tricky. You might find it easier to do this right before sealing the mouth/nose piece gap. If you used a basting stitch, remove it.
Step 9: End
Finally, tuck the raw edges in for the ears and sew into the proper position with a ladder stitch. Bring it up to your eye line for appropriate alignment. Tack the earpiece’s corners together before stitching them in place to give it a lovely rounded look. It also provides the illusion of a charming ear hole.
When Can These Steps Be Useful?
When we are talking about the utility of the steps, it means we will discuss the use of the sock monkey for different purposes. Check the below-stated points:
- You can present them to the small kids on their special days, such as birthdays, Christmas, and several others.
- Sock monkey can be an excellent item for home decor. You can hang them on your walls to add a different look to them. Besides, you can also place your soft and cozy sock monkeys in your bedding environment.
- You can tell these steps to your small children so that they can make it by themselves. Sewing or stitching can be a difficult task for them, so you can give your assistance as well.
- You can also place them on your couch along with the cushions, pillows, and sham.
Final Words!
You were reading this post until the end can help you in learning how to make a sock monkey. It can be a stressbuster, and you can use it for different purposes, as stated in this post. Furthermore, you can find a way to spend some quality time with your kids by involving them in this project. If you liked this post, then make a visit to our blog section and explore more.


: Tijuana’s Donkey Shows")
